Thursday, March 31, 2011

Weekends 6, 7, 8, and 9- Let There Be LIGHT! (MEGA-post)

Last time I posted I apologized for my weekend update being so late.  I don't know what to even say about the tardiness of this post!  Haha!

I will say, I have been extremely busy the past few weeks.  Sometimes when I get this busy, it is better for my sanity to drop some of the guilty pleasures in my life like stalking people on facebook and blogging (baha!), and give my full attention to the other tasks at hand.  However, because I enjoy looking back at our house progress (and I'm sure you all are dying see the progress and know what was keeping me so busy, right?  ;) ), I will give you a quick run-down on what has been going on.

Let's see here...

Between weekends 5 and 6:  I bought 33 yards of fabulous fabric to make window coverings for the main living areas in our new house.  Everytime I'd go to the FM store, I'd get so distracted and throw all of my design plans out the window.  I finally realized I needed to set an "inspiration" in stone, and I found this picture:


It's sideways....Oops.  I tried to fix it, but it didn't work, and I'm not trying again because I have better things to do :).  Anywho...I love it.  It is just the cover of one of those paint color pamphlets  Not what I was originally going for, but is definitely what our new house needs to look like.  It is lighter and airier (thank goodness!) than our current "look," yet very similar.  It has some of Wes's nice/expensive, dark wood vibes and some of my light and airy, assymetrical and creative vibes.  I think the detail I loved most was the fabric on the pillows.  I looked all over the place for similar fabric with no luck.  Then one day, I drove by the FM store and just pulled in to the parking lot (no, it was not my intended destination)  The first fabric I saw was this:

I love the similar colors and the pretty design!  Though it is not excact, it is definitely close enough for me!  The FM store had just gotten a new shipment of fun fabrics.  I also found these beauties amongst the new fabric and fell in love:)
I will use them for the curtains for the kitchen, laundry room, living room, and the red will be in the dining room.  I love how they have a rough texture but an elegant design...just perfect!  Can't wait to get sewing!

Weekend 6:  CAN LIGHTS!  Lighting is the thing that has taken up the most time the past three weekends.  Here is a semi-before picture of the basement.  We only had the two lights that are shining on the fireplace in this picture.  Needless to say, at night, it was super dark down there!


Not anymore!  The lights made such a huge difference in the basement.  We are now kinda can-light-happy:)  We are adding them everywhere...and loving it!  
 He also added 3 canlights and the wiring for 4 pendant lights around the bar area in the basement.  He actually removed a wall sconce and a plant light in that crazy brick wall thing and used the wiring and the switches for the new lighting:)  The can lights are hanging, and the wires will be connected to the pendants once the drywall finishers finish the ceiling and the walls.  (We don't want them to get nasty:))

Isn't it pretty!?

Between Weekends 6 and 7:  I spent much of my time planning a reunion with my friends from high school.  Also, Wes took a couple days off of work to help build a cardboard box maze for a youth event at our church.  I helped them a little on Friday.  It was SO FUN!  Sadly, we had to miss the actual event.  I heard it was AMAZING and I think 8 kids got saved!  Praise the Lord!!!

Weekend 7:  We did not work on the house at all because we were having a blast in Branson!  I do not have a good picture to sum up the weekend, sadly, but it was so wonderful to see everyone!  There were 15 of us total...a mix of high school buddies, their spouses, and their babies.  It had been several years since I had seen most of them, but we decided that must change.  I'm thinking our reunion is going to be an annual thing!

Between weekends 7 and 8:  We finally got our current house on the MLS!  I cleaned a lot, and Wes installed a new stainless steal dishwasher and cleaned the garage a bit.  I feel it looks cluttered and unimpressive online, as there are pictures of the INSIDE of my closets and pantry! Yikes!  Hopefully, someone will see beyond the pictures and come check us out!  No one has looked at it yet, but I've been keeping it nice and tidy!!  It's kinda funny, I don't think it looks a whole lot different than it has the past year, but every time people come over (like...every single time someone has visited) they comment, on how certain things are so clean, or it feels so much more open.  I did't think that much had changed (furniture is the same...I didn't re-organize the closets or pantry...), but maybe I'm a bigger slob than I thought!  Haha!

My cousin, Missy, came over one day.  She has been watching cake shows on TV, and wanted to learn some cake tricks, so I baked some cup cakes and she baked a cake and we dug into my 5 gallon bucket of frosting:)  Not to shabby for her first try, huh?  ;)  They look awesome!


Weekend 8:  We shopped a lot on weekend 8.  We picked out our granite for the counter tops and tile.  Wes also did a lot of plumbing and ripped out the tub in the basement and put in a new one.  It looks a lot worse than it did before, so I don't have before and after pictures.  He also scraped all of the popcorn off of the ceilings in the entire basement.  It was MESSY!  He also got rid of a lot of our trash.  That sounds like a minor thing, but when you are doing this much demolition, it is a BIG job!  I'm sure he did more, but it was a less "noticable" weekend.

After weekend 8, I had an absolute ball buying pretty things for the house!  Wes's mom and I went and picked out the specific slabs of granite we thought would be best (because each slab is a little different), and found lots of other goodies!  If you are doing any type of construction project and are in Springfield, you must know about Creative Associates.  It's amazing, and you can find great deals!  Here are a few of my finds:
Most of them are iphone pictures, so they are not the greatest.  I just love this slate herringbone tile.  The plan is to use it for the backsplash.  It is only $4.90 a square foot!  My second choice was $17!  Yikes!  The smallest square tile is a sample of our granite.  There is more color and movement in the larger slabs, and the bottom tile is the tile we chose for the flooring and for the showers.  It is not travertine, but is the best imitation travertine we have ever seen.  And at only 1.50 a square foot, for a very rich look, we'll take it!  Wes is super excited because it comes in 20X20 tiles, which means he can throw up about 15 tiles, and an entire shower will be finished! 

Pictured below is one of the things I'm MOST excited about!  There was a battle raging in me...between oil rubbed bronze light fixtures and brushed nickel.  I love brushed nickel, especially in bathrooms, but I felt many of the rooms needed some grounding (something "solid") with all of the light colors and white I will be using.  It needed some dark elements.  Then I found this beauty.  It is a mix of dark antinque gold (but looks more like a pewter) and brushed nickel.  Now I can use darker fixtures and brushed nickel, depending on the needs of the room, and these lovely things will tie everything together!  I think I'm going to lose the lamp shades, though.  This particular chandelier was a little over $50 and is BEAUTIFUL!  I got one for the dining room and one for the master bathroom, and a giant version of it for our entry way.  Can't wait to see them up!


The fixture pictured below is for the office/future nursary.  It is the dark pewter color.  $68! LOVE!

And we got 2 of these lovely fixtures for over our soon to be giant and amazing island in the kitchen.  They remind me of Restoration Hardware, and have bubble glass!  $49!  Ahhhhh!!!!  I looked at lights for the rest of the house at Metro Builder's Supply and Lowe's after finding these great deals and was appalled by the prices.  Sadly, I will have to suck it up for the bathrooms and some of the other rooms because Creative Associates was lacking when it came to brushed nickel fixtures. 

I also made a cake for a kid from my church.  It should have been easy, but turned into one of the most stressful cakes I've ever made.  I used colorflow, and I guess I didn't give it enough time to dry, or mixed it wrong, because it did not solidify.  I had to carefully cut the wax paper around the designs and put it on the cake because everything was breaking.  It looks great in the iphone picture, though! 


Last weekend (Weekend 9) Wes's dad and brother came over and helped.  It was so nice of them to sacrifice their time.  They did a lot of drywalling in the bathrooms, and Eric cleaned and organized a TON!  Cleaning is something we have a hard time keeping track of  because it doesn't FEEL productive when we have SO much to do!  It is, however, extremely necessary, so it was nice of him to take care of that icky job.  And for those of you who don't know, Wes's dad is an exceptionally professional drywaller, so our walls are looking GREAT! :)  Wes also added can lights to the kitchen.  Now it can look like daylight in the middle of the night. 
 Much better with more lights!

 I didn't mention that the past several weeks I have mostly been bashing out all of tile in the house.  I think it is pretty much all gone now.  Sometimes I get violent.  In one such case, I knocked a huge hole in backsplash of our kitchen and made a grand discovery!!! 

The huge and awkward bump-out in the wall in the laundry room is being used as a ginormous vent! (the picture below shows the bump-out on the left wall)  Wes said we can definitely make it smaller, and add some space to our cramped laundry room!  Yay!  We also think we will probably be able to add some sort of a nook in the wall.  I'm thinking at the very least we will be able to add a much needed hanging rod and some shelving for cute baskets, but I'm dreaming of a small bench with shelving and a hanging rod.  :)


And that's about it.  Really.  Haha.  Thanks to those of you who stuck around to read the whole thing!  We have a lot going on this week.  Hired professionals are making their first appearance and I only have one non-house related plan, so it should be good.  Can't wait to see what happens! 

Wednesday, March 2, 2011

Weekend 5- Baby Steps

Sorry the update is a bit late!  I feel like it's been pretty crazy around here!  Looking back, it really shouldn't have felt as crazy as it did!  Oh well!

I did not get to do much work on the house this past weekend because I was making this...

For this little guy.  He turned 2!!!


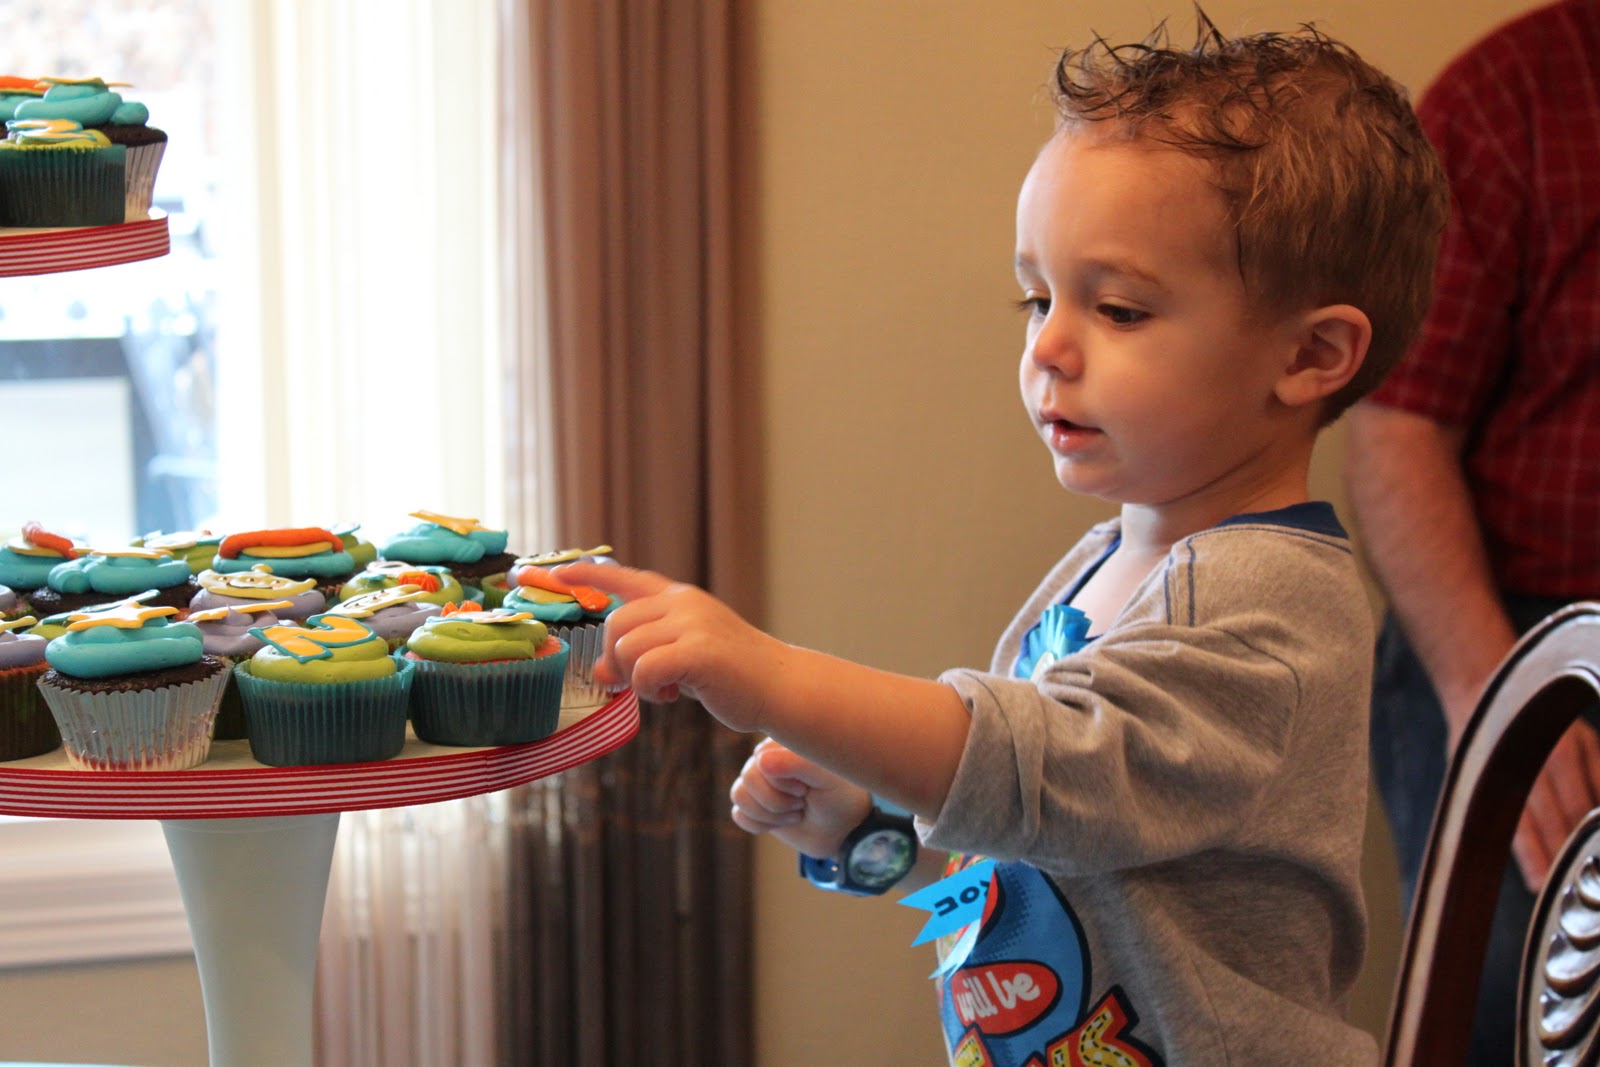
There is absolutely no other person on earth who I would rather make cakes for.  This is because there is not other person who loves cake as much!  I've talked about his love for cupcakes before, here.  I think the first time I noticed it was at Zane's batman party.  He just stood by the cupcake stand and stared.  He stuck out his little finger because he wanted to touch them so badly.  Occasionally, he would slip, and his finger would barely dent the icing.  I have so many pictures of him admiring the cupcakes at his Buzz Lightyear themed party and so many stories I'd love to share.  I'll just stick with one, this time:)  Like I said, he just stares at the cupcakes amazed.  I'm sure his little mouth is watering like crazy when he does this.  It's so cute, and it is very evident that his parents are teaching him self-control!  At one point, when he was sitting in the chair by the cakes, he picked up a cupcake and just held it close to his nose for about 10 seconds.  He was inhaling deeply, and I kinda wonder if he gave it a little lick too:).  He then looked up, and gently put the cupcake back.  It was precious!  I guess the embarrasement from the post linked above really taught him a lesson:)

According to crazy Uncle Wesley, the cupcake toppers also can be used as face art.  What a silly picture!


The party was super cute!  Even baby Brandt got into the festivities!  (sooo cute!!!!)


Unlike myself, Wesley did work on the house, despite his own crazy schedule.  He added drywall to the master bathroom.  It's looking great!  Obviously, still a ton of work to do, but we are making progress:)


Here's the view from the shower area.  Check out weekend 4's pictures to see what it was looking like:)


He also knocked down the weird brick thing in the basement.  It looks sooo much more open!  It's hard to see in the picture, but I also ripped out the tile in the bar/dining area.  I was feeling kind of badly about not working on the house for so long, so I made sure to get some work in yesterday.  It only took about 2 1/2 hours, but it was tough.  Oh to be a big strong Wesley!  About halfway through, I noticed my hammer-holding hand had a blister, and my forearm was swollen and super hard.  I felt like Popeye!  It didn't hurt or anything.  I kind of liked it.  It made me feel ripped!  Who needs to work out when you can work on...a house!!!


One condition that made demolishing the pretty pink tile difficult was the fact that my goggles kept fogging up.  Dr. Sister Shawn, I wanted to take them off so badly...but I didn't for you.  (Well, and a little bit because there were sharp shards of glaze popping me in the face every few minutes!


Aren't saftey goggles fun?  Not.  Kinda...
I had to wait until these ridiculous lines dissappeared before I allowed myself to go into public.  (And now I'm posting it for the world to see)

The end of big house progress until next weekend!  I should be working on the house instead of writing this blog post, but I planned on staying home and taking a nap today!  Wes's brother, Eric, loaned us this amazing grinder for Wes's espresso machine.  Wes made me a latte with some new coffee beans we wanted to try.  I drank half of it around 7 last night, and haven't slept since!  In the middle of the night, I totally planned my future garden at the new house.  Haha!  Now, I feel like crap...still buzzing, yet extremely tired...
I wonder if there was something else in those beans....
hmmm....

Have a happy day!  Hope the wonderful weather makes you giddy!!!

Saturday, February 26, 2011

Cupcake Toppers for Kids!

The past two days, I mostly spent my time working on birthday cakes and cupcakes for my cutie-pie nephew's birthday party, which was today.  I started decorating cakes in the fall of 2009, when I took a class at Michael's.  Though I am thankful for the class for getting me motiviated, I can't really say that it is necessary to make fun cakes.  I think most everyone can do it!

One thing that I have been experimenting with lately is color flow.  I was introduced to it in the class, but a class definitely isn't necessary for understanding it!  It is quite simple, and I truly believe anyone can do it!  It's like coloring! (And who doesn't love coloring?  ...seriously...)  Basically, you can make small, hardened sugar designs out of colorflow.  In class we made a blue bird for a cake, but I found that it works exceptionally well making little do-dads for cupcakes.  It's awesome, because you can match it to any theme or color scheme (I just find images that I like online), and you don't have to be an expert cake decorator to use it!

I generally google the images I want to make into cupcake toppers.  Jaxon is having a Buzz Lighyear themed party, so I found the Toy Story aliens, stars, moons, planets, rockets, and the Toy Story 2 number 2.  If I find something that is close to what I want, I crop it to make it the right size.  I also do a test print and adjust the size according to what would look best on the cupcake (and I try to fit as many on a page as possible).  Honestly, I probably went a little bit overboard.  Like I said before, I think anyone can do this, but if you are pressed for time, I would stick to just a few colors and simple designs.  I had 6 designs and 5 colors and made 130.  The whole process took about 4 1/2 hours...because I'm ridiculous.  It really doesn't have to take that long.  However, I would wait until you have a chunk of time to start the project, especially if it is your first time.

Below are the pictures I used to make the designs.  I just got some images online and copy/pasted them into an Open Office document.  The aliens needed to be cropped, as well as the two.  As you can see...as many on a page as possible (without them touching).

I also think you need a plan for colors.  This is one of my cake "plans."  It's cheesy and hand drawn, but it helps me to get an idea of how colors will coordinate and such.  I have the colors planned for the designs, the cupcake liners, and the frosting, as well as what flavor gets what color.  If you make one, it will help with the process.  I promise.


Pictured below is the colorflow.  It comes with instructions on how to make it.  One batch only requires 2 tablespoons, so this canister will last quite a while.  I'm not positive how much it costs, but I think it's around $8.  However, I always use 40% coupons at Michaels for this kind of thing, which makes it very affordable.  Other things you will need to make the colorflow is 1 pound of powdered sugar, water, gel icing colors, and disposable pastry bags.


I tape the paper on cookie sheets, then use double stick tape to adhere wax paper on top of it.  You can see the images through the wax paper.


Make the colorflow after everything is set up using the instructions found on the can.  It is not tricky at all:)  Here is one batch.  It makes quite a bit.  Do note, you must use grease free untensils, bowls, and pastry bags.  This means metal, glass, or never used plastic.  This is why I use the disposable pastry bags, as all frosting is is grease!  The toppers won't set properly if there is grease!


To color it, I put about 2 large spoonfuls in a small glass bowl, added a toothpick full of my desired color, and stirred with a spoon.  I usually am not afraid of adding a lot more color than that to frostings (I add spoonfuls instead...I like VIBRANT colors!), but you are working with such small amounts that usually a toothpick is all you need with colorflow.  If you didn't get enough color with the first toothpick, get a new one and add some more.  Do not use toothpicks with sugar (leftover colorflow) on them, as they will ruin your gel colors.  Another bit of advice I would give, if you do not do this kind of stuff often, is just get the primary colors.  If you are good at mixing, you can make just about any color you want with just yellow, red, and blue (and maybe black and brown, just to simplify the process.)  A little bit of colorflow will make quite a few of these little toppers.  Make sure you cover the colorflow that is not being used with a damp cloth, as it dries quickly.

I like to put my pastry bag in a cup, as shown below, to fill it.  I like to keep it clean!


Twist the top of the bag and hold the bag in your palm as show below.  This just came naturally to me, but it doesn't to everyone, so I thought I'd share ;)  Cut a very very small portion of the tip of the bag to release the color flow.  You can always make the hole bigger, but it's hard to make it smaller!


Color away!  I'm sure there is a proper order to do the colors and tracing/filling.  However, I generally just do the color progression that would require the least amount of dishes!  I started with white.  Then made yellow in the same bowl.  Then I did green, because I wanted a yellowish-green.  It worked for me.  Every design is different, so it may be different for what you are doing.  If you are filling a space, first outline it, and then fill it.  It all just "flows" together.


When I'm done with a color, I twist the top and bottom of the pastry bag, as shown below, and stick it in a sandwich sized ziploc bag with a wet paper towel in it, just in case!


Let the cupcake toppers dry in a place that doesn't get much light, as light and UV rays can alter some colors and cause them to fade.  I keep them in a spare bedroom with the shades and curtains closed.  You can make them well in advance.  The Wilton website says they should last indefinitely if stored properly...though I would feel weird serving it if it were too old.


Aren't they cute!


They look so much more exciting with bright, colorful frosting and fun cupcake liners!  This is why it is okay to go with the simple designs, or fewer designs, to save lots of time!  You can also embellish with frosting, like I did with orange frosting on the rockets and planets.  I felt it needed some warmer colors to balance the red on the big cake.  It adds a bit of pizzazz!

So there you have it!

If you would like more info, visit http://www.wilton.com/idea/Color-Flow.  They have all the information you might need on colorflow, as well as tons of other great cake decorating tips!

I BELIEVE IN YOU!  YOU CAN DO IT!!!

Thursday, February 24, 2011

Spicy Chicken Dip

My aunt brought this spicy chicken dip to my sister's bridal shower.  It was so wonderful, that I asked for the recipe.  Now, everytime I make it, at least one person asks for the recipe.  Yes, folks, it's that good.  The recipe is kind of vague.  I didn't realize how vague it was until I had some high school students make it in my FACS class while I was teaching.  Because of this, I'll share a few things I like to do when making this recipe to help you out.  (P.S.  I always make a double batch if there are more than 6 or so people.  It generally disappears quickly...and if it doesn't, the leftovers never last long at my house!)

Spicy Chicken Dip
2 chicken breast ( grilled or sauteed in pan with olive oil, Mexican Spice and garlic.)  When I make it, I just use a packet of taco seasoning per batch.  I put the seasoning and the chicken in a gallon ziploc bag and shake it, shake-and-bake style.  I then cook it, covered, on medium high heat.  The seasoning tends to burn before the chicken is done in the middle if I don't cover it.

Cool the chicken and tear or cut into small pieces.  I found a way to shred it when it's hot...I don't like waiting:)  Make sure the pieces are small.  It is a dip, after all.  I made it for my cousin's baby shower, and was in a hurry, so I didn't make the pieces as small as they should have been.  It was more like an entre'.  Luckily, people still gobbled it up!

Mix together:

½ c. milk
½ c. mayo
8 oz cream cheese (room temperature) Just microwave it...it's all going to be heated anyways.  Also, I bet you can use fat-free or low-fat everything.  The other ingredients are so flavorful.
½ to a whole diced red pepper  I used yellow last time.  It tasted the same, but didn't look as appetizing:)
jalepenos to taste

Add all together.  Bake in casserole dish at 350 degrees for 20 to 25 minutes.  I'm not going to lie.  I always just microwave it until it's hot.  I'm pretty sure it would be perfect in a crock pot too. 

Serve it with tortilla chips, wheat thins, doritos...I sometimes eat it plain...

Enjoy!!

Monday, February 21, 2011

Weekend 4- Complete Craziness!

This week was full of unexpected good times!  If you recall from my last post, my mom visited me for a week.  Since she left things have just been crazy!  I had 3 friends unexpectedly visit Springfield from out of town!  THREE!  It's kind of a weird thing that never fails to happen.  My friends from college (who do not necessarily talk to each other) always show up in the same week.  Like...the past 4 times I have seen them.  It's ridiculous!

Despite all of my visitors, Wes and I got a lot accomplished on the house and in life.  (There are some important and exciting things in our future!  Don't worry.  I'll share!)

Let's start with the house.

I finished one more vanity.  I really hoped to finish them all this week, but that didn't even come close to happening!  I was way too busy having fun!

Wes built some headers, did some plumbing, and knocked down walls and the arched ceiling in the master bathroom.  We have an amazing plan for this room!  I am so excited about it!

Here's what it looked like with walls...


It's a bit drafty in there right because there is no ceiling.  You can see all the way through the attic, to the roof!  (The picture below was taken from  the shower area looking into the master bedroom.)  Notice the arched drywall.  It will be so much more open feeling without the wall and the higher ceilings!!!

I debated on whether or not I even wanted to add the next picture for two reasons.  1.  I wasn't supposed to do this until our house was finished (but it was so stinkin nice outside!!!) and 2.  It was a total disaster.  I painted the doghouse.  It did not turn out quite like I imagined.  I'm hoping it looks happier on a sunny day.  In the future, I'd like to add some more white trim around the edges, a cute sign that says "Dixie," and maybe some planters around it...or terra cotta pots with cutsie little flowers.  I told Wes I think it looks trashy.  He agreed and dissed my color.  I'm convinced it's a good color, so I blamed his unfinished dog house:)  I am now totally set on making this doghouse super cute without repainting it.  Wes said I'm prideful and that we should just re-paint it.  It's totally true...I'm prideful.  It will look cute in the future.  Mark my words!  If you have any ideas, please share.  Like I said, I'm determined :)


I'm sad...I might like the before better...


Two lovely ladies from youth group have been visiting me and creating an AMAZING piece of art for our mantel.  I found a piece online that was EXACTLY what I wanted...but it was super expensive.  I knew these girls are very artistic, so I showed them the painting.  They said they thought they could recreate it...and have they ever!  This is just a sneak peak of the work in progress.  I'll share how we did it and the final results later!  We have one more work day before it's complete:)


In other exciting news, we are getting a foreign exchange student for the fall semester next year!!  We had an interview on Thursday evening, and got the last bit of our information in today.  Most people think we are crazy, and question why we are doing it now, but Wes and I are extremely pumped about it.  Many of you probably know that I LOVE when people stay with us.  We feel we are in a great season of our life to be able to really pour into our student and give him a great international experience!  We are praying that we all get along, and that it is an enjoyable experience.  We are also praying that we all learn and grow from it!  If you want to shoot up a little prayer for us, that would be awesome.

We are already planning some trips we hope to take the kid on.  Today I met with my friend, Karson, and began planning our trip to Montana.  We had this trip planned before we decided to get a student, but we are thrilled that there is a chance he will be able to come.  We are going to fit a ton in the week and a couple of days that we are planning.  It is going to be crazy and amazing!  A few of the things we have planned are Glacier National Park, Yellowstone Park, Mt. Rushmore, Canada, as well as stopping and doing a little sight seeing in Denver, CO and Sioux Falls, SD.  I can hardly wait!  I heard all of those places are so breathtaking!

Speaking of breathtaking...spring flowers....my favorite.  I'm pretty sure I see some daffodils sprouting up in my yard.  My mom planted them last summer, so I haven't seen them bloom yet!  I think it's time I planted those tulips I didn't plant last fall.  I read that if they are chilled they can be planted in very early spring.  They have been chilled, and they are starting to sprout in the bag!  I hope they do well, as I am using them to help "stage" our house for spring.  If you have any advice on that, do share!

Hope you have been enjoying the warmer weather!  (Please be gone for good, winter!!!)

:)

Monday, February 14, 2011

Weekend 3

First of all, it is Valentine's day, so I just wouldn't feel right if I didn't say something about my precious man friend...


 He is wonderful, and I love him very dearly...


And he is super manly, talented, and smart.  He completed this bathroom like he completes me.  This 1/2 is now a whole:)


I try to make him smile like he makes me smile.  Yes...that is a Forrest Gump themed Valentine's gift.  I'm lame, but it's the only idea I had.


Basically, he's wonderful.  God has really, really blessed me:)

This weekend  update is a little late, and for that, I apologize.  My mom visited me from Wednesday, and is leaving in the morning.  Guess what she did.  That's right.  Finished the wallpaper project.  What a saint, she is!  Haha!  She also painted the inside of the vanities in the basement.  Basically, she did the crappiest jobs ever (and even got sick from the fumes in the process:( ).  She didn't complain once.  I'm so thankful to have a mom like her.  While she did those terrible tasks, I began the refinishing process on the vanities in the basement.  I only finished one, and the before and after pictures are below.  The other 2 vanities are in various stages of the process.  I stripped the finish, sanded, stained, glazed, and polyurethaned them.  I can't decide if I love them or not.  The grain is so heavy, and the cabinet isn't as dark as I hoped it would be, even after 3 applications of stain.  I think I will barely have enough stain to finish the vanities upstairs, so I might get a darker stain for them.  I visited Sherwin-Williams the other day (after I had already started staining the basement cabinets), and saw they had a much better selection of stains than Lowes.  They also gave advice that contradicted what the Lowes people told me...and it worked.  I think I am going to visit them more often!  I used the glaze over the stain, after it was dry, of course.  I love that it adds depth and a richness to the cabinets!  Maybe all the ugliness around the cabinet is distracting me:)  We'll see how I feel about them when the walls no longer look like purple sandpaper, and they nasty carpet is replaced with travertine:)


I apologize for the bluish tint.   This vanity was a beat up version of the typical, orangy oak cabinets found in lots of homes.


That's basically all we did this weekend.  This house is going to be a slow project, but I'm still thoroughly enjoying it:)  I'm so glad I am, as we've only owned it for 2 1/2 weeks!  Ha!

Hope your Valentine's Day was full of love!!!