One thing that I have been experimenting with lately is color flow. I was introduced to it in the class, but a class definitely isn't necessary for understanding it! It is quite simple, and I truly believe anyone can do it! It's like coloring! (And who doesn't love coloring? ...seriously...) Basically, you can make small, hardened sugar designs out of colorflow. In class we made a blue bird for a cake, but I found that it works exceptionally well making little do-dads for cupcakes. It's awesome, because you can match it to any theme or color scheme (I just find images that I like online), and you don't have to be an expert cake decorator to use it!
I generally google the images I want to make into cupcake toppers. Jaxon is having a Buzz Lighyear themed party, so I found the Toy Story aliens, stars, moons, planets, rockets, and the Toy Story 2 number 2. If I find something that is close to what I want, I crop it to make it the right size. I also do a test print and adjust the size according to what would look best on the cupcake (and I try to fit as many on a page as possible). Honestly, I probably went a little bit overboard. Like I said before, I think anyone can do this, but if you are pressed for time, I would stick to just a few colors and simple designs. I had 6 designs and 5 colors and made 130. The whole process took about 4 1/2 hours...because I'm ridiculous. It really doesn't have to take that long. However, I would wait until you have a chunk of time to start the project, especially if it is your first time.
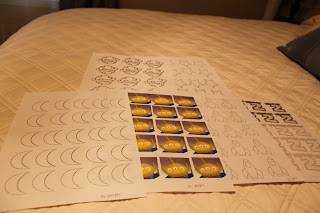
Below are the pictures I used to make the designs. I just got some images online and copy/pasted them into an Open Office document. The aliens needed to be cropped, as well as the two. As you can see...as many on a page as possible (without them touching).
I also think you need a plan for colors. This is one of my cake "plans." It's cheesy and hand drawn, but it helps me to get an idea of how colors will coordinate and such. I have the colors planned for the designs, the cupcake liners, and the frosting, as well as what flavor gets what color. If you make one, it will help with the process. I promise.
Pictured below is the colorflow. It comes with instructions on how to make it. One batch only requires 2 tablespoons, so this canister will last quite a while. I'm not positive how much it costs, but I think it's around $8. However, I always use 40% coupons at Michaels for this kind of thing, which makes it very affordable. Other things you will need to make the colorflow is 1 pound of powdered sugar, water, gel icing colors, and disposable pastry bags.
I tape the paper on cookie sheets, then use double stick tape to adhere wax paper on top of it. You can see the images through the wax paper.
Make the colorflow after everything is set up using the instructions found on the can. It is not tricky at all:) Here is one batch. It makes quite a bit. Do note, you must use grease free untensils, bowls, and pastry bags. This means metal, glass, or never used plastic. This is why I use the disposable pastry bags, as all frosting is is grease! The toppers won't set properly if there is grease!
To color it, I put about 2 large spoonfuls in a small glass bowl, added a toothpick full of my desired color, and stirred with a spoon. I usually am not afraid of adding a lot more color than that to frostings (I add spoonfuls instead...I like VIBRANT colors!), but you are working with such small amounts that usually a toothpick is all you need with colorflow. If you didn't get enough color with the first toothpick, get a new one and add some more. Do not use toothpicks with sugar (leftover colorflow) on them, as they will ruin your gel colors. Another bit of advice I would give, if you do not do this kind of stuff often, is just get the primary colors. If you are good at mixing, you can make just about any color you want with just yellow, red, and blue (and maybe black and brown, just to simplify the process.) A little bit of colorflow will make quite a few of these little toppers. Make sure you cover the colorflow that is not being used with a damp cloth, as it dries quickly.
I like to put my pastry bag in a cup, as shown below, to fill it. I like to keep it clean!
Twist the top of the bag and hold the bag in your palm as show below. This just came naturally to me, but it doesn't to everyone, so I thought I'd share ;) Cut a very very small portion of the tip of the bag to release the color flow. You can always make the hole bigger, but it's hard to make it smaller!
Color away! I'm sure there is a proper order to do the colors and tracing/filling. However, I generally just do the color progression that would require the least amount of dishes! I started with white. Then made yellow in the same bowl. Then I did green, because I wanted a yellowish-green. It worked for me. Every design is different, so it may be different for what you are doing. If you are filling a space, first outline it, and then fill it. It all just "flows" together.
When I'm done with a color, I twist the top and bottom of the pastry bag, as shown below, and stick it in a sandwich sized ziploc bag with a wet paper towel in it, just in case!
Let the cupcake toppers dry in a place that doesn't get much light, as light and UV rays can alter some colors and cause them to fade. I keep them in a spare bedroom with the shades and curtains closed. You can make them well in advance. The Wilton website says they should last indefinitely if stored properly...though I would feel weird serving it if it were too old.
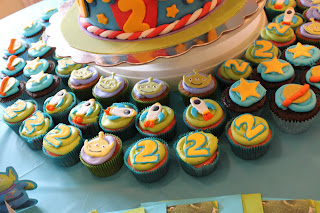
Aren't they cute!
They look so much more exciting with bright, colorful frosting and fun cupcake liners! This is why it is okay to go with the simple designs, or fewer designs, to save lots of time! You can also embellish with frosting, like I did with orange frosting on the rockets and planets. I felt it needed some warmer colors to balance the red on the big cake. It adds a bit of pizzazz!So there you have it!
If you would like more info, visit http://www.wilton.com/idea/Color-Flow. They have all the information you might need on colorflow, as well as tons of other great cake decorating tips!
I BELIEVE IN YOU! YOU CAN DO IT!!!


No comments:
Post a Comment